(Solution) xampp apche access error: „Apache2: ‚AH01630: client denied by server configuration'“

2. Mai 2017 at 19:16

If you are using Apache 2.4

You have to check allow and deny rules

Check out http://httpd.apache.org/docs/2.4/upgrading.html#access

In 2.2, access control based on client hostname, IP address, and other characteristics of client requests was done using the directives Order, Allow, Deny, and Satisfy.

In 2.4, such access control is done in the same way as other authorization checks, using the new module mod_authz_host.

The new directive is Require:

2.2 configuration:

Order allow,deny
Allow from all

2.4 configuration:

Require all granted

Also don’t forget to restart the apache server after these changes (# service httpd restart)

Please share this article von facebook & google plus or where you want, thank you!

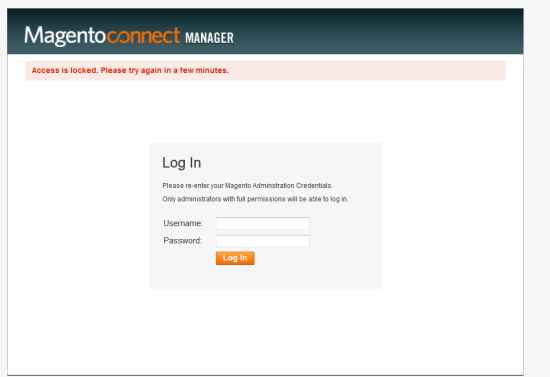
Magento Connect Error: „Access is locked. Please try again in a few minutes.“ (solution)

25. Oktober 2016 at 15:37

magento-connect-login-error

First Solution

Check the file var/brute-force.ini in the Magento-Root-Folder. The Content is like this:

brute-force-bad-attempts-count = 0
brute-force-diff-time-to-attempt = 180

Set the content to this and try again. If it not work check the second solution now!

Second Solution

A other reason behind that is that the Magento Connect Manager has not been initiated by a previous install/upgrade. It could be because this store has been installed by transferring files via FTP.

Thus, the only method to upgrade you’ve got is by the CLI.

First, you need to ensure the permissions are right:

chmod 550 ./mage

Then you’ve got to initiate the mage:

./mage mage-setup .

And set your preferred state for the configuration:

./mage config-set preferred_state stable

Now, with a previously setup mage you could have run the following:

./mage list-installed
./mage list-upgrades

And then upgrade like this:

./mage upgrade-all

But in your case this won’t list nor upgrade and you’ll have to force the install of the upgrade by doing the following:

./mage install http://connect20.magentocommerce.com/community Mage_All_Latest --force

Once the upgrade is done, don’t forget to reindex:

php shell/indexer.php reindexall

NB: after this upgrade, you’ll be able to see the list of packages in the connect manager.


Please share this article von facebook & google plus or where you want, thank you!
(Solution): MDN CrmTicket Bug when searching for a name and go back to Grid View

23. August 2016 at 18:18

firebug

In function „getCondition“ in der class
app/code/community/MDN/CrmTicket/Block/Admin/Widget/Grid/Column/Filter/CustomerName.php

change this buggy part

        if ($customerIdsSelected && sizeof($customerIdsSelected)>0) {
            if((count($customerIdsSelected) == 1) && count($customerIdsSelected[0] > 0)) {
                return array('in' => $customerIdsSelected);
            } else {
                return null;
            }
        }
        else
          return null;
      }

to

        if ($customerIdsSelected && sizeof($customerIdsSelected)>0) {
            if(count($customerIdsSelected) == 1 && count($customerIdsSelected[0]) > 0) {
                return array('in' => $customerIdsSelected);
            } else {
                return null;
            }
        }
        else
          return null;
      }

BTW: The programmer from MDN-CrmTicket unfortunately disregard both Zend and Magento Coding Style Guide! 🙁


Please share this article von facebook & google plus or where you want, thank you!
Sending json data to a remote server – howto

21. April 2016 at 14:00

firebug

If you’re sending json requests there are different possible solutions on programming with php. Here some different explained:

1. Using Streams

‚method‘ => ‚POST‘,
‚content‘ => json_encode( $data ),
‚header’=> „Content-Type: application/json\r\n“ .
„Accept: application/json\r\n“
)
);

$context = stream_context_create($options);
$result = file_get_contents($url, false, $context);
$response = json_decode($result);
var_dump($response);

2. Raw HTTP Post

Using Zend Framework’s HTTP client: http://framework.zend.com/manual/en/zend.http.client.advanced.html#zend.http.client.raw_post_data

$json = json_encode($data);
$client = new Zend_Http_Client($url);
$client->setRawData($json, ‚application/json‘)->request(‚POST‘);
var_dump($client->request()->getBody());

3. Using Curl

<?php
$content = json_encode($data);
$curl = curl_init($url);
curl_setopt($curl, CURLOPT_HEADER, false);
curl_setopt($curl, CURLOPT_RETURNTRANSFER, true);
curl_setopt($curl, CURLOPT_HTTPHEADER,
        array("Content-type: application/json"));
curl_setopt($curl, CURLOPT_POST, true);
curl_setopt($curl, CURLOPT_POSTFIELDS, $content);
curl_setopt($curl, CURLOPT_SSL_VERIFYPEER, false); //curl error SSL certificate problem, verify that the CA cert is OK
$result     = curl_exec($curl);
$response   = json_decode($result);
var_dump($response);
curl_close($curl);
?>

4. Using Ajax

var data = <?php echo json_encode($data) ?>;
var url  = '<?php echo $url ?>';
jQuery.ajax({
    type: "POST",
    url: url,
    data: JSON.stringify(data),
    contentType: "application/json; charset=utf-8",
    dataType: "json",
    success: function(data){
        var jsonObj = jQuery.parseJSON(data);
        alert(jsonObj.encPassword);
    },
    failure: function(errorMsg) {
        alert(errorMsg);
    }
});

Please share this article von facebook & google plus or where you want, thank you!

Anleitung: PostgreSQL-Servers unter xampp installieren

19. Januar 2016 at 15:51

db

Ein PostgreSQL-Servers unter xampp installieren ist gar nicht so schwer, hier die Anleitung dazu:

Nach dem XAMPP installiert ist legt man im Ordner unter „C:\XAMPP“ (oder wo xampp installiert wurde) ein neuen Ordner namens „pgsql“ sowie darin ein Ordner „data“ (also C:\xampp\pgsql\data) an. Die PostgreSQL könnt ihr laden unter http://www.postgresql.org/download/ .

Startet die Installationsroutine von postgresql und ändert das Installationsverzeichnis zu „C:\XAMPP\pgsql“.

Danach installieren wir phpPgAdmin, ein adäquat zu phpMyAdmin um die Datenbank zu verwalten.
Dazu legen wir im xampp Ordner den Ordner „C:\XAMPP\phpPgAdmin“ an.
phpPgAdmin downloaden unter http://phppgadmin.sourceforge.net/doku.php?id=download

Jetzt müssen wir xampp noch dazu bringen auch mit der PostgreSQL zusammen zuarbeiten.
Dazu editieren wir die Datei „C:\XAMPP\phpPgAdmin\conf\config.inc.php“.
Sucht dort nach der Zeile

$conf[‚extra_login_security‘] = true;

und ändert diese in

$conf[‚extra_login_security‘] = false;

In der Datei „php.ini“ im Verzeichnis „C:\XAMPP\php“ sucht ihr die Zeile

;extension=php_pgsql.dll

und ändert diese in

extension=php_pgsql.dll

In der Datei „http-xampp.conf“ im Verzeichnis „C:\XAMPP\apache\conf\extra“ sucht ihr nach dem folgenden AbschnittfügtAlias /phpmyadmin „C:/XAMPP/phpMyAdmin/“
<Directory „C:/XAMPP/phpMyAdmin“>
AllowOverride AuthConfig
</Directory>

Und fügt darunter die folgende Zeile hinzu:

Alias /phppgadmin „C:/XAMPP/phppgadmin/“
<Directory „C:/XAMPP/phppgadmin“>
Options Indexes FollowSymLinks MultiViews
AllowOverride all
Require local
Order Deny,Allow
Allow from all
</Directory>

Jetzt den Apache-Server neu starten (geht direkt über das XAMPP Control-Programm) und Ihr könnt über den Web-Browser und der URL (http://localhost/phppgadmin) auf den PostgreSQL-Server zugreifen.

Falls benötigt, der Default-User ist „postgres“ 😉

Please share this article von facebook & google plus or where you want, thank you!
Magento 1.9.2.2 Upgrade Conflict issue / SUPEE-6788 security patch – Solution for this problem

10. November 2015 at 11:25

db

Magento has released a new upgrade for Magento which includes the SUPEE-6788 Patch Bundle. Note that this upgrade can break some modules which are not correctly coded.

I have tested the upgrade thru Magento Connect Manager but it failed.

I am testing in Linux Bash / Windows CLI:

chmod 755 mage
sudo -u www-data ./mage list-upgrades
sudo -u www-data ./mage upgrade-all

I have the same error in command line

Error:
upgrade-all: Failed to delete files: /home/data/www/magento_dev/./pkginfo/Mage_All_Latest.txt
Check permissions
Error:
upgrade-all: Package community/Interface_Adminhtml_Default 1.9.2.2 conflicts with: community/Mage_All_Latest 1.9.2.1
Error:
upgrade-all: Package community/Interface_Frontend_Default 1.9.2.2 conflicts with: community/Mage_All_Latest 1.9.2.1
Error:
upgrade-all: Package community/Interface_Install_Default 1.9.2.2 conflicts with: community/Mage_All_Latest 1.9.2.1
Error:
upgrade-all: Package community/Mage_Downloader 1.9.2.2 conflicts with: community/Mage_All_Latest 1.9.2.1
Error:
upgrade-all: Package community/Mage_Centinel 1.9.2.2 conflicts with: community/Mage_All_Latest 1.9.2.1
...

On stack exchange, there are some idea how to proceed.

Solution – First Step

cd pkginfo
# rm -Rf Mage_All_Latest.txt Mage_All.txt
# cd ..
# sudo -u www-data ./mage upgrade-all
Installing package community/Mage_All_Latest 1.9.2.2
Package community/Mage_All_Latest 1.9.2.2 installed successfully
Starting to download Interface_Adminhtml_Default-1.9.2.2.tgz ...
...done: 1,014,275 bytes
Installing package community/Interface_Adminhtml_Default 1.9.2.2
Package community/Interface_Adminhtml_Default 1.9.2.2 installed successfully
Starting to download Interface_Frontend_Default-1.9.2.2.tgz ...
...done: 747,738 bytes
Installing package community/Interface_Frontend_Default 1.9.2.2
...

Now delete the maintenance.flag file and your shop is updated and online! 🙂

Please share this article von facebook & google plus or where you want, thank you!

Magento: Access Denied errors after installing SUPEE-6285 or since Magento 1.9.2.1 – ACL Error – Solution

13. August 2015 at 15:06

If you use restricted admin accounts, some menus of third party extensions might not work anymore for them. The reason is that the default return value of Mage_Adminhtml_Controller_Action::_isAllowed() has been changed from true to Mage::getSingleton(‚admin/session‘)->isAllowed(‚admin‘). Extensions that do not override this method in their admin controllers because they don’t use the ACL, now need the „ALL“ privilege.

The only solution is to patch the extensions and add this method to all their admin controllers:

protected function _isAllowed()
{
  return true;
}

Or if they actually have an ACL resource defined in etc/adminhtml.xml:

protected function _isAllowed()
{
  return Mage::getSingleton('admin/session')->isAllowed('ENTER RESOURCE IDENTIFIER HERE'); //e.g. 'admin/sales/productreturn'</pre>
} 


Please share this article von facebook & google plus or where you want, thank you!

Magento: Product options are wrong if order edit in admin and last order article is taken

15. Juli 2015 at 12:48

php code

If you edit an order and take over last article it is possible that the wrong product options are mapped.

The reason is that the wrong options are taken – not the „options“ taken – magento get the „info_buyRequest“-options from the database, but sometimes the „options“ array has the options data that you need.

You can solve this problem with overwriting the „getBuyRequest()“ function in app/code/local/Mage/Sales/Model/Order/Item.php with this php code:

/**
 * Returns formatted buy request - object, holding request received from
 * product view page with keys and options for configured product
 *
 * @return Varien_Object
 */
public function getBuyRequest()
{
    $option = $this-&gt;getProductOptionByCode('info_buyRequest');   // this get the wrong options
    $option2 = $this-&gt;getProductOptionByCode('options');
    foreach($option2 as $option_tmp) {
        if($option_tmp['option_type'] == 'area'
            || $option_tmp['option_type'] == 'file'
            || $option_tmp['option_type'] == 'field'
            || $option_tmp['option_type'] == 'date'
            || $option_tmp['option_type'] == 'date_time'
            || $option_tmp['option_type'] == 'time'
        ) {
            $option['options'][$option_tmp['option_id']] = $option_tmp['value'];
        } elseif($option_tmp['option_type'] == 'drop_down'
            &amp;&amp; $option_tmp['label'] == 'Farbe'
            &amp;&amp; $productOptions = $this-&gt;getProduct()-&gt;getOptions()[$option_tmp['option_id']]-&gt;getValues()
        ) {
            foreach($productOptions as $productOption) {
                if($productOption-&gt;getData('title') == $option_tmp['value']) {
                    $option['options'][$option_tmp['option_id']] = $productOption-&gt;getData('option_type_id');
                }
            }
        } else {
            $option['options'][$option_tmp['option_id']][0] = $option_tmp['option_value'];
        }
    }
    unset($option2, $option_tmp, $productModel, $attr);
    if (!$option) {
        $option = array();
    }
    $buyRequest = new Varien_Object($option);
    $buyRequest-&gt;setQty($this-&gt;getQtyOrdered() * 1);
    return $buyRequest;
}


Please share this article von facebook & google plus or where you want, thank you!

Magento: Cancel old orders / Alte Bestellungen stornieren

24. März 2015 at 15:18

php code

Um alte Bestellungen in Magento zu stornieren könnt ihr den folgenden php-code verwenden:

To cancel old orders in Magento, e.g. with state „pending“, „holded“ or „pending_payment“ you can use the following php-code:

    public function autocancelPendingOrders()
    {
        $orderCollection = Mage::getResourceModel('sales/order_collection');
        $orderCollection
            ->addFieldToFilter('state',
                array(
                    array('eq' => 'pending'),
                    array('eq' => 'holded'),
                    array('eq' => 'pending_payment')
                ));
        $orderCollection->addFieldToFilter('created_at', array(
                'lt' =>  new Zend_Db_Expr("DATE_ADD('".now()."', INTERVAL 2 HOUR)")))
            ->getSelect()
            ->order('entity_id')
//            ->limit(20)
            ;
        foreach($orderCollection->getItems() as $order)
        {
            $orderModel = Mage::getModel('sales/order');
            $orderModel->load($order['entity_id']);
            if($orderModel->getState() == 'holded') {
                if(!$orderModel->canUnhold()) {
                    continue;
                } else {
                    $orderModel->unhold();
                    $orderModel->setStatus('new');
                }
            }
            if(!$orderModel->canCancel()) {
                continue;
            }
            $orderModel->cancel();
            $orderModel->setStatus('canceled');
            $orderModel->save();
        }
    }

Magento Warenkorb Daten im Header / Warenkorb auslesen – Magento: get cart data

6. Januar 2015 at 14:58
Den Warenkorb von Magento kann man wie folgt auslesen:
<?php
      $_countHelper = $this->helper('checkout/cart')->getSummaryCount();  //get total items in cart
      $_totalHelper = $this->helper('checkout/cart')->getQuote()->getGrandTotal(); //get total price
      if($count==0)
      {
        echo $this->__('<a href="/checkout/cart" class="cartgo">(0 ITEMS)</a>',$count);
      }
      if($count==1)
      {
        echo $this->__('<a href="/checkout/cart" class="cartgo">(1 ITEM)</a>',$count);
      }
      if($count>1)
      {
        echo $this->__('<a href="/checkout/cart" class="cartgo">(%s ITMES)</a>',$count);
      }
      echo $this->__('', $this->helper('core')->formatPrice($total, false));
    ?>

Please share this article von facebook & google plus or where you want, thank you!